
08 Apr How to Clean a Dutch Oven

How to Clean a Dutch Oven
Once you purchase the perfect Dutch Oven you may be wondering what you need to know to take care of it. Many Dutch Ovens come pre-seasoned. If not, you should make sure to properly season your Dutch Oven before you use it. This will provide a better non-stick type surface that will make cleaning your Dutch Oven easier. It is also good to remember that it is easier to clean your Dutch Oven right after cooking instead of waiting as food will continue to bake on as it cools.
One way to easily clean your Dutch Oven is to prepare and cook meals using a Dutch Oven liner. These liners are specifically designed to be placed inside of the Dutch Oven for cooking and can be removed and discarded afterward. You can achieve the same effect by lining your Dutch Oven with aluminum foil as well. The disadvantage to using aluminum foil or Dutch Oven liners is that you lose a lot of the Dutch Oven flavor when cooking. If you choose not to use a Dutch Oven Liner, here are the important steps to follow to keep your seasoned Dutch Oven clean:
- For the best cooked flavor you’ll want to cook directly in the Dutch Oven without a liner. To clean your Dutch Oven this way, when you are finished cooking a meal, dish out the food and then remove any leftovers to an alternate container. This will not only allow you to begin the cleaning process sooner, but will ensure that the food does not continue to cook as a Dutch Oven will hold the heat for quite some time.
- With the Dutch Oven emptied of food, add some water to the Dutch Oven, replace the lid, and place it back over the coals. The coals will continue to heat the water and create a steam. This will allow the Dutch Oven to steam and loosen the remaining food particles. If you have water ready as you dish out the food you could have it sitting over the coals and steaming while you are enjoying your Dutch Oven meal.
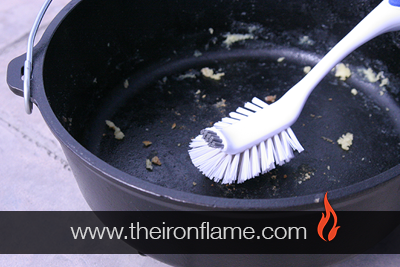
- After you have finished your delicious Dutch Oven meal, you are ready to remove the Dutch Oven from the coals and let it begin to cool. After it has begun to cool down and has reached a temperature that is warm enough but not too hot, use a rubber dish scraper or sponge to scrape off and remove any remaining food particles that haven’t come off during the steaming process. Depending on the meal you cooked you may have quite a bit of food particles floating in the water by the time you are finished with this process.
- Once you have scrapped or scrubbed the interior surface you can discard the dirty water. Look to see if you have removed all of the food particles. If there are some that are still stuck use the scraper or sponge again until you have the entire surface of the Dutch Oven cleaned. For burnt on food or particularly sticky menus, you may have to repeat the heating and steaming process in order to loosen the remaining food items. This is most often not necessary. No matter how burnt-on the food or how messy your Dutch Oven is, never use soap in the cleaning process of your Dutch Oven. Continue cleaning your Dutch Oven using a repeated heating and scrubbing or scraping method until all food residue is removed.
- With all of the food particles removed from the Dutch Oven you should rinse it thoroughly with clean water.
- Once the Dutch Oven is completely clean you need to make sure that is thoroughly dried. The easiest way to dry the Dutch Oven is to hang it over a fire or coals with the lid slightly askew. This will allow any moisture that is left to heat up, vaporize, and escape from the Dutch Oven. You should only have to have it over heat for a few minutes for this to happen. If you don’t have a fire going you can let the Dutch Oven air dry for a few minutes to ensure all of the moisture has escaped.
- The Dutch Oven is now dry and ready to be re-conditioned. The act of re-conditioning your Dutch Oven after each use ensures it stays seasoned as well as helps to prevent rust. Using a paper towel quickly rub a small amount of vegetable oil over the inside and outside surfaces.
- After rubbing on the oil, use a dry paper towel to wipe out any excess. You want to only leave a light layer of oil protection and no puddles in the Dutch Oven. This will protect your Dutch Oven as well as it prepared for quick and easy use next time.
While it might seem there are many steps to cleaning your Dutch Oven, you’ll quickly find that it is actually easier to care for and clean than many other cooking dishes. As you use your Dutch Oven more and more the natural seasoning will build-up from the fats in your dishes and cleaning will become easier and easier. Taking the time to clean your Dutch Oven after each use makes cooking with it more enjoyable and easier the next time.
No Comments