
01 Apr How to Season a Dutch Oven

How to Season a Dutch Oven
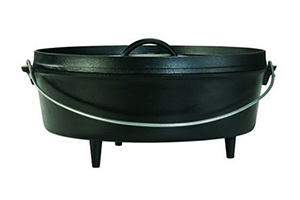
Once you choose the perfect Dutch Oven, you may be excited to take it home and get right to cooking a fabulous new recipe. However, Dutch Ovens are sold with a protective coating that is designed to prevent rust. Before you can cook in it, you need to remove this coating and properly season your Dutch Oven. Seasoning is an important part of preparing your Dutch Oven for cooking to prevent corrosion as well as to prepare the surface for cooking. A seasoned Dutch Oven is like cooking with a non-stick pan vs. cooking with a traditional pan that requires much more cleaning. An added advantage to seasoning your Dutch Oven is that it will help to add flavor to your food! Here are the steps you should follow to season your Dutch Oven for the first time:
- You can season your Dutch Oven either in your regular oven or on the grill. When seasoning it is normal for oil to drip from the Dutch Oven so if using your regular oven you should place the Dutch Oven on a cookie sheet with a rim that is larger than the Dutch Oven to catch this dripping oil.
- Before seasoning you will want to completely clean your Dutch Oven to remove the protective coating. This one time you will use soapy water to completely clean the coating and any residue from the coating out of the Dutch Oven. This is the only time you will use dish soap to clean your Dutch Oven. Using dish soap to clean your Dutch Oven after seasoning and regular use is not necessary and can ruin the seasoning.
- Once you have completely washed the Dutch Oven, it is time to rinse and dry it. Rinse with clear water until you see no soap residue left. Then dry the Dutch Oven. Before seasoning you should make sure that you have used paper towels or a cotton towel to completely dry the interior of the Dutch Oven. Placing it on the grill or in the oven for a couple of minutes and allowing it to cool and then wiping it off again will ensure you have removed all of the soap residue and water.
- Allow the Dutch Oven to cool until you are able to touch it. You will be handling the Dutch Oven during this step and an oven that is too hot will cause burns. With the oven cool you will use vegetable shortening to begin the seasoning process. When choosing a vegetable shortening you can use any brand as long as it is plain vegetable shortening, you do not want to use butter flavored shortening. You should also not use butter to season your Dutch Oven. Using the vegetable shortening, you will rub it all over every surface of the Dutch Oven. You need to rub the inside, the outside, and both sides of the lids. The best way to apply and rub in the vegetable shortening is with the use of a paper towel. When rubbing the shortening on the surfaces be sure to get into any divots, holes, or dimples. You need to also make sure that you get a consistent layer of shortening on every surface. These steps will ensure that every area of your Dutch Oven is seasoned.
- With the Dutch Oven covered in vegetable oil, you should place it in the oven to cook in the seasoning. If you are using your home oven it should be at 350 degrees. Turn the Dutch Oven upside down so that the oil can drain out of the Dutch Oven as it melts leaving an even coating instead of a puddle in the bottom of your Dutch Oven. If there is room in the oven or grill place the lid in as well, if there is not room for the lid you can cook it after the Dutch Oven. The Dutch Oven should cook in your grill or oven for forty-five minutes to an hour. This will allow time for all of the shortening to melt or be soaked in by the cast iron material. (Remember if you are cooking your Dutch Oven inside your home’s oven you should open windows or doors for proper ventilation.)
- When the Dutch Oven has baked long enough you can turn off the grill or oven, but leave the Dutch Oven inside as it cools. Let it remain in the oven for at least fifteen minutes or until cool enough to remove with an oven mitt.
- Once the Dutch Oven is out you should rub the surfaces of the Dutch Oven again with paper towels. This will help to finish the coat of shortening as well as remove or wipe out any excess oil from inside the Dutch Oven and off of the lid.
- This is an initial seasoning. To complete the seasoning process you should repeat the steps of coating the Dutch Oven with shortening, baking it, cooling it, and wiping off the excess oil. Doing this a second time ensures that no areas of the Dutch Oven were missed as well as provides a better season coat to make for easier cleaning.
In addition to seasoning your Dutch Oven after your initial purchase, it is normal that over time you might want to re-season it. Many Dutch Oven users season their ovens at the beginning of every season. To re-season your Dutch Oven you follow the same procedure as above only omitting the cleaning it with soapy water. With a properly seasoned Dutch Oven you are ready to get cooking!
No Comments